
How to Inspect Your Sewer Lines with a Camera Locator


You can keep your house safe and save a lot of money by checking your sewer lines often. If you check your sewer lines early, you can stop big repair costs. The table below shows how a simple check can help you save a lot of money:
Cost Type |
Amount |
|---|---|
Average Repair Cost |
|
Preventive Inspection Cost |
$250 - $350 |
Potential Savings |
$2,206 - $2,306 |
You just need the right tools, like an Inspection Camera or a sewer camera with locator. Many people use the Powerwill L09D1 Sewer Inspection Camera, Powerwill L09D2 Sewer Inspection Camera, and Powerwill 10DX1 Sewer Inspection Camera to check their sewer lines. The Best Sewer Cameras for DIY and Professional Jobs make checking sewer lines easy and work well.
Key Takeaways
Check your sewer lines often to save money on repairs. Preventive checks cost between $250 and $350. Repairs can cost more than $2,500.
Use a sewer camera with locator for good inspections. Pick one with clear pictures, a long push-rod, and a strong signal.
Always wear safety gear when you inspect. Wear gloves, safety glasses, and a hard hat to stay safe from danger.
Record what you find with videos and notes. This helps you or a plumber fix problems fast and correctly.
Call a professional if you see big problems. If you notice drains not working or bad smells, get expert help.
Essential Tools and Safety Tips
You need the right tools and must think about safety before you check sewer lines. Sewer lines can be dangerous. You should protect yourself and use tools that help you stay safe and work well.
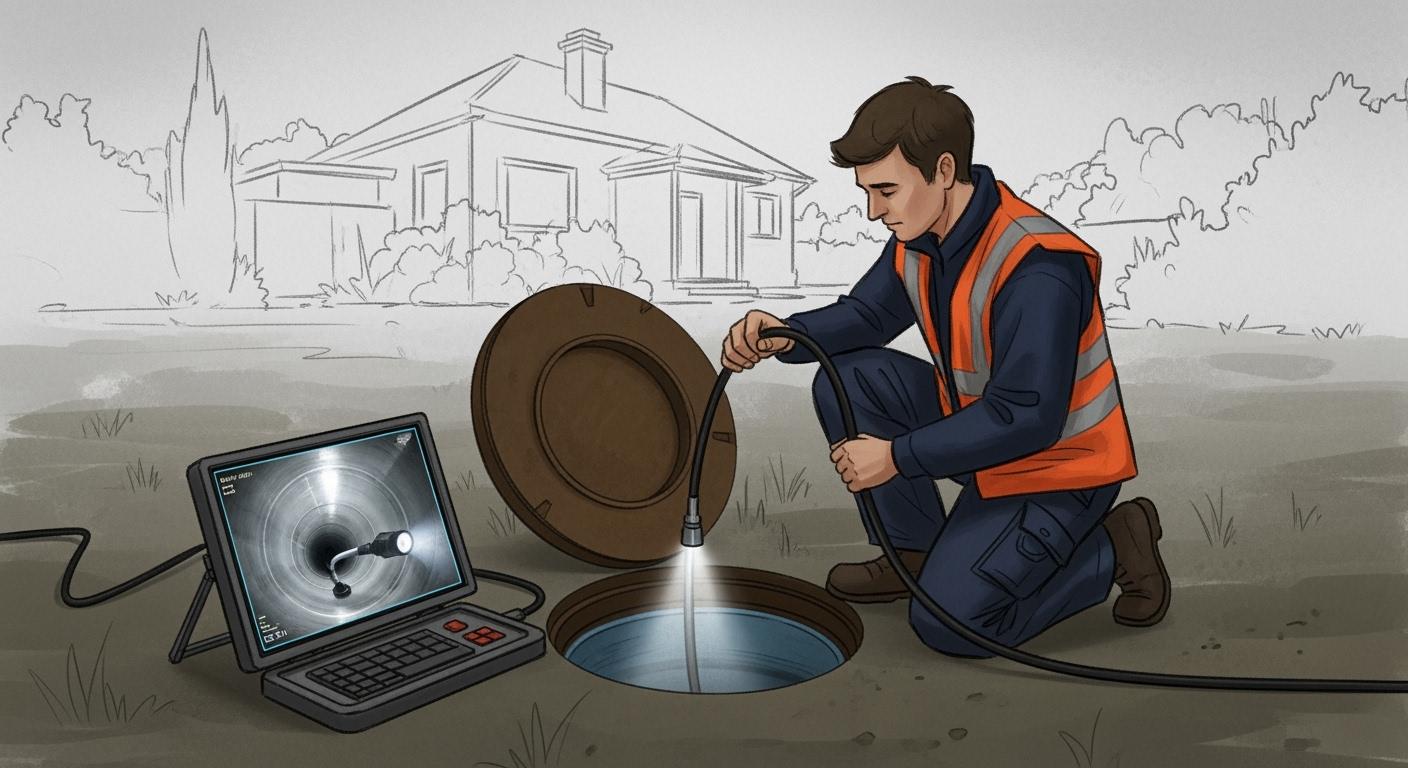
Sewer Camera with Locator Kit
A sewer camera with locator kit lets you look inside pipes. It also helps you find the exact spot where there is a problem. When you pick a sewer inspection camera, look for features that make your work easier and safer. Here is a simple guide to help you choose the best drain camera and locator system:
Feature |
Description |
|---|---|
Camera Head & Optics |
Shows clear pictures, stays level, has bright lights, and is tough. |
Push-Rod & Reel |
Long, bends easily, goes around corners, and counts how far it goes. |
Sonde (Beacon) |
Sends a 512 Hz signal so you can find the spot. |
Control Unit & Recording |
Has a bright screen, WiFi, saves videos and photos, and shares them easily. |
Make sure your sewer camera has a clear screen and a strong battery for long checks. A good buying guide can help you compare these things. Using a sewer camera with locator lets you see inside and mark the exact place where there is a problem.
Protective Gear and Supplies
Wear the right protective gear before you use a sewer inspection camera. Sewer lines can have germs, chemicals, and other dangers. Here are the most important things you need:
Hard hat keeps your head safe from things that might fall.
Face shield and safety glasses protect your eyes from splashes and dirt.
Gloves keep your hands safe from chemicals and germs.
Heavy-duty boots or rubber boots protect your feet and stop slips.
High-visibility vest helps people see you if you work near cars.
Ear plugs protect your ears if you use loud tools.
First aid kit helps you treat small injuries fast.
Tip: Always check your protective gear before you use it. Clean it after each sewer inspection. Replace anything that is broken right away.
You should know about common dangers. These are electric shock, germs, chemical burns, getting hurt by moving tools, and accidents in small spaces. Always follow safety rules like OSHA 1910.146 for small spaces and OSHA 1910.307 for electric safety.
If you use the right sewer camera, wear the right gear, and follow safety rules, you can check your sewer lines safely and lower your chance of getting hurt.
Preparing for Sewer Inspection
Find and Access the Clean-Out
Before you start a sewer scope inspection, you need to find the clean-out. The clean-out is a special pipe that gives you access to the sewer line for inspection. You can usually spot outdoor cleanouts near exterior walls, behind bushes, or inside recessed boxes. Indoor cleanouts often sit in bathrooms near toilets, in garages or utility rooms by floor drains, or in basements if your home has a slab foundation.
A clean-out looks like a large pipe with a threaded cap. You may find it above ground or in a ground box. Inside your house, cleanouts look similar and are usually in basements or utility rooms, close to where the main sewer line exits. Most home cleanouts are white or black plastic pipes with caps. You might see them near the foundation, in the yard, driveway, or basement.
Tip: If you cannot find the clean-out, ask your plumber for help. They know where to look and can confirm the location.
Here are some common places to check for clean-outs:
Near the base of each vertical drain stack, at least 6 inches above the lowest flood level.
Outside the building wall, no more than five feet away, especially if you have a crawl space under 18 inches.
Flush with the finished floor or above it for below-grade cleanouts.
Clear the Area and Safety Measures
You need a safe and clear workspace for a successful sewer scope inspection. Start by making sure all access points to the sewer line are easy to reach. Move any furniture, boxes, or other items away from these spots. If you see bushes or landscaping blocking the clean-out, trim or remove them.
Follow these steps to prepare for sewer inspections:
Clear the area around the clean-out.
Remove anything that could block your path or tools.
Check that you have enough space to set up your camera and locator.
Confirm the location of all clean-outs before you begin the inspection.
Note: A clean workspace helps you avoid accidents and makes the sewer scope inspection go faster.
You should always wear your protective gear before starting the inspection. This keeps you safe from germs, chemicals, and other hazards in the sewer line. Careful preparation leads to better results and helps you spot problems early during sewer inspections.
Setting Up Your Sewer Camera with Locator
You need to set up your sewer inspection camera and locator system before you start any inspection. This step helps you avoid problems and makes sure you get clear results. Many modern systems, like a drain inspection camera or a pipe inspection camera, use new technology to make the job easier and safer.
Assemble the Camera and Locator System
Follow these steps to assemble your sewer inspection camera and locator:
Place the drain camera system on a stable surface. Make sure it will not tip over.
Lay out all parts on a clean area. This helps you keep track of small pieces.
Connect the camera head to the push cable. Tighten all waterproof seals to stop water from getting inside.
Plug in the control unit. Use a reliable power source or a fully charged battery.
Turn on the monitor, camera LEDs, and storage device. Check that the video feed is clear.
Attach the locator to the camera system. Make sure it is secure and ready to send signals.
Tip: Always check the user manual for your specific sewer camera with locator. Some models may have extra steps.
Test the Camera and Locator
You should always test your sewer inspection camera before you insert it into the pipe. This step helps you find problems early.
Power on the control unit and camera. Look at the live video feed to check for a clear image.
Adjust the LED lights and focus. Good lighting helps you see inside the pipe.
Activate the locator. Test the signal to make sure you can find the camera tip underground.
Record a short video or take a photo. This checks that the storage device works.
Newer drain camera systems use high-resolution imaging and strong lighting. Some even have real-time feedback and wireless controls. These features help you spot issues faster and keep you safe during inspection.
Note: Testing your equipment before each inspection saves time and helps you avoid mistakes.
Inserting and Navigating the Sewer Inspection Camera
Proper Insertion Techniques
You need to handle the drain camera with care when you start a sewer scope inspection. Place the drain camera and locator near the clean-out. Hold the drain camera steady and push it gently into the pipe. Do not force the drain camera if you feel resistance. Slow and steady pressure helps you avoid damaging the drain camera or the pipe. If you meet a bend, twist the drain camera and locator slightly to help it move around corners. Always keep your hands dry and wear gloves for safety.
Check the cable as you feed the drain camera into the line. Make sure the drain camera and locator cable does not tangle or kink. If you see water or debris on the cable, wipe it off before it enters the pipe. This keeps the drain camera lens clean and gives you a clear view during the sewer scope inspection.
Tip: Never push the drain camera and locator too fast. You might miss important signs of trouble in the pipe.
Navigating and Monitoring the Video Feed
Watch the video feed closely as you guide the drain camera through the sewer line. The drain camera and locator system lets you see inside the pipe in real time. Look for cracks, roots, or blockages. Adjust the light on the drain camera if the image looks too dark or too bright. Use the drain camera and locator to mark the location of any problems you find.
Here are some best practices for monitoring the video feed during a sewer scope inspection:
Best Practice |
Description |
|---|---|
Equipment Check |
Check the drain camera and locator cables for cuts or kinks. Clean the lens and lights. |
Safety Measures |
Place cones if you work near a driveway. Keep a phone nearby for emergencies. |
Video Monitoring |
Watch for cracks, roots, and grease. Adjust the drain camera angle for clear images. |
Documentation |
Record video and take photos at key points. Add notes about pipe material and size. |
Keep the drain camera and locator moving slowly. If you see an obstruction, stop and try to move the drain camera gently. Do not force it. Use the locator to find the exact spot above ground. This helps you mark problem areas for repair. Always record your findings during the inspection. Good notes and clear video help you explain issues to a plumber or make repairs yourself.
Using the Drain Camera and Locator to Find Issues
You can find sewer line problems quickly when you use a drain camera and locator. This step-by-step process of using both tools helps you see inside the pipe and know exactly where to dig if you need repairs. Here is how you can use the drain camera and locator to make your sewer inspections more effective:
Stand near the drain opening. Hold the drain locator at a 45-degree angle above the ground. This angle helps you get the best signal from the camera head inside the pipe.
Insert the drain camera into the sewer line. Watch the live video feed on your monitor. The drain camera sends clear images so you can spot blockages, cracks, or roots as you move through the pipe.
When you see a problem on the screen, stop pushing the drain camera. Pick up your drain locator and slowly sweep it in a circle above the ground. Listen for the tone or watch the signal strength on the display. The tone will get louder or the signal will get stronger when you are right above the camera head.
Mark the spot on the ground with chalk, tape, or a small flag. This shows you the exact location of the problem under your yard or floor. Repeat this process for each issue you find during the inspection.
Tip: Move the drain camera slowly and check the video feed often. If you rush, you might miss small cracks or early signs of trouble.
The drain camera and locator work together to give you a real-time view of the pipe and the exact spot of any problem. You do not have to guess where to dig. Consumer-grade sewer camera locators help you see what is wrong and where it is. These tools are waterproof and flexible, so you can use them in almost any sewer line.
Here are some reasons why the drain camera and locator make sewer inspections easier:
You can see the inside of the pipe as you move the drain camera forward.
The drain locator device helps you find the camera head underground.
You can mark the surface above any problem, which saves time and money.
Sewer line locators reduce the need for digging up large areas.
Advanced drain camera and locator systems give you clear video and strong signals.
Tool |
What It Does |
Why It Helps You |
|---|---|---|
Drain Camera |
Shows live video of the pipe’s inside |
Lets you spot problems quickly |
Drain Locator |
Finds the camera’s position underground |
Pinpoints exact repair spots |
Marking Supplies |
Marks the ground above issues |
Guides repairs and digging |
You should always use the drain camera and locator together for the best results. The drain camera lets you see the problem. The drain locator tells you where it is. This method makes your inspection more accurate and helps you avoid extra work.
If you want to get the most out of your sewer inspections, follow these steps every time. You will find issues faster and fix them with less mess.
Interpreting Inspection Results
Common Sewer Problems to Look For
When you use a drain camera to check your sewer line, you can spot many common problems. You should look for these issues during your inspection:
Blockages from grease, hair, or foreign objects. These blockages often slow down water flow and cause backups.
Intrusive blockages from toys, jewelry, or other items that get stuck in the pipe. These blockages can stop water completely.
Tree root intrusions. Roots can enter the sewer line and look like spider webs or thick mats on the drain camera feed. These blockages can break pipes and cause leaks.
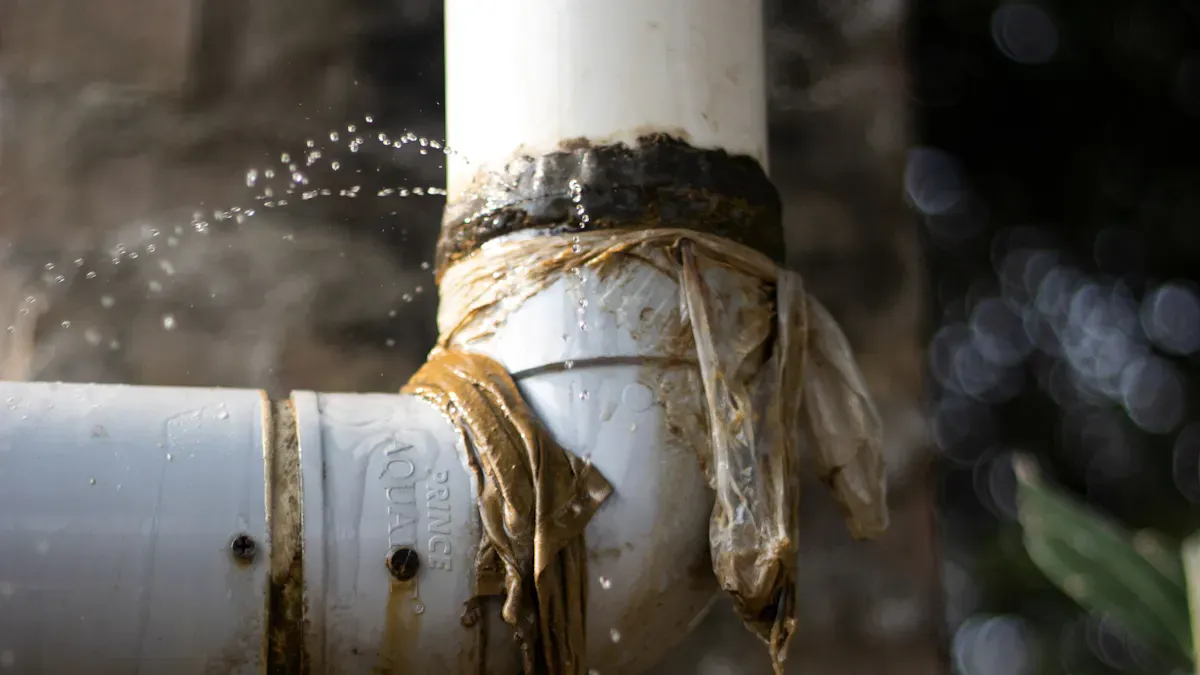
Cracked or broken pipes. You may see cracks or breaks on the drain camera screen. These problems can lead to leaks and soggy spots in your yard.
Debris buildup. Sediment and mineral deposits can collect in the sewer line. These blockages make the pipe smaller and increase the risk of clogs.
Pipe corrosion. Rust and corrosion can weaken the sewer line. You may see rough or flaky spots on the drain camera video.
Misaligned or collapsed pipes. The drain camera can show pipes that do not line up or have fallen in. These blockages can stop water and cause backups.
Tip: If you see roots, cracks, or puddles above the sewer line, you may have a serious problem. Use the drain camera to check for soft or sunken spots in your yard.
Documenting and Analyzing Findings
You should always record what you see with the drain camera. Good records help you or a plumber fix blockages and other problems in your sewer line. Here are some steps to follow:
Take clear videos and photos with the drain camera. Show all blockages, cracks, and root intrusions.
Write down the location of each problem. Use the drain camera locator to mark where blockages or damage appear.
Measure the size of cracks or blockages if possible. This helps you decide how to fix the sewer line.
Make a simple report. List each issue, add photos, and write what you think caused the blockages.
Keep your records safe. You may need them for future repairs or to show a professional.
What to Document |
Why It Matters |
|---|---|
Videos and Photos |
Show proof of blockages and damage |
Locations of Problems |
Help find the exact spot to repair |
Size of Blockages |
Decide the best way to fix the issue |
Summary of Findings |
Make repairs faster and easier |
Note: Clear records from your drain camera inspection make it easier to plan repairs and keep your sewer line working well.
Troubleshooting and Practical Tips
Handling Obstructions and Malfunctions
You may face problems when you use a drain camera and locator. Sometimes, the drain camera gets stuck or the video feed stops working. You can solve many of these issues with a few simple steps.
Check the power source for your drain camera and locator. Make sure the battery is full and all cables are tight.
Look at the push cable. It should bend easily so you can move the drain camera around corners.
Clear any blockages in the pipe before you push the drain camera further. This helps you avoid getting the drain camera stuck.
If the monitor does not show a clear picture, check all connections. Try restarting the system.
Clean the drain camera lens after each use. Dirt or water spots can make the image blurry.
Make sure you have enough space on your storage device to save videos and photos.
Charge the battery fully before each use. Do not store the drain camera and locator with a low battery.
Update the software on your drain camera and locator. New updates can fix bugs and improve how the system works.
Tip: If the drain camera gets stuck, pull it back slowly. Do not force it. For tough blockages, you may need to call a plumber.
Ensuring Accurate Location and Inspection
You want the best results from your drain camera and locator. Good inspection accuracy helps you find problems fast and fix them right the first time. The drain locator helps you mark the exact spot above ground. You can improve accuracy by following these tips:
Always clean the drain camera lens before you start. A clean lens gives you a clear view.
Use the drain locator at a 45-degree angle for the best signal.
Move the drain camera and locator slowly. Fast movements can cause false readings.
Mark each problem spot as you find it. This keeps your inspection accuracy high.
Update your drain camera and locator software often. Updates can improve accuracy and add new features.
Many homeowners make mistakes during inspections. The table below shows common errors and how you can avoid them:
Mistake |
Description |
|---|---|
Mistaking shadows for cracks |
Shadows or reflections can look like damage if the drain camera angle is wrong. |
Overlooking signs of corrosion |
Early corrosion may look small and easy to miss on the drain camera feed. |
Assuming the blockage is isolated |
One clog may be part of a bigger problem in the sewer line. |
Failing to identify grading or flow problems |
Small flow changes can show sagging or poor pipe slope, which you may miss without close checks. |
Note: Take your time with the drain camera and locator. Careful work leads to better inspection accuracy and fewer missed problems.
Next Steps After Inspection
When to Call a Professional
You may finish your inspection with a drain camera and still have questions about what you see. Some problems need expert help. You should know when to call a plumber for your sewer line. The table below shows clear signs that you need a professional:
Criteria |
Explanation |
|---|---|
Persistent Drainage Issues |
Slow or backed-up drains may mean blockages or pipe damage. |
Unpleasant Odors |
Bad smells can point to sewer line problems. |
Water Damage |
Wet spots or mold may come from hidden leaks. |
Routine Maintenance |
Regular checks keep your plumbing system healthy. |
You may also notice that the drain camera footage is hard to understand. Homeowners often miss small cracks or mistake shadows for damage. Professionals use advanced tools and know how to read the drain camera video. They can find hidden problems in your sewer line and fix them the right way.
Tip: If you see water damage, smell foul odors, or have slow drains after using the drain camera, call a plumber right away.
DIY Repairs and Maintenance
You can fix small issues and keep your sewer line clear with regular care. The drain camera helps you spot problems early. You should follow these steps to prevent future blockages:
Inspect your sewer line with a drain camera at least once a year.
Dispose of grease, wipes, and other waste in the trash, not the drain.
Use a drain camera to check for roots and install root barriers if needed.
Clean your pipes with safe products or a plumber’s snake if you see buildup on the drain camera.
Replace or reline damaged pipes if the drain camera shows cracks or breaks.
Use drain strainers to catch hair and food scraps before they enter the sewer line.
Fix leaks as soon as you see them with the drain camera.
You should also know the limits of a DIY drain camera inspection. Homeowners may miss hidden problems or misread the drain camera video. Professionals use special equipment and have more skill with the drain camera. They can move the drain camera through tough spots and give you a full report.
Note: Regular use of a drain camera and good habits keep your sewer line working well. Fix small problems before they grow.
You get lots of good things from using a camera and locator for sewer checks. You can find problems early. This saves you money and stops big emergencies. Checking your sewer lines often keeps your house safe. It also helps your plumbing last longer.
If you find problems early, you do not have to pay for big repairs. You also help keep the environment clean.
Checking once a year makes you feel better and helps with insurance rules.
If you see a hard problem, you should call a pro for help.
Issue Found Early |
Emergency Repair Cost |
|
|---|---|---|
Small clog |
$150 |
$800 |
Minor crack |
$300 |
$2,000 |
Tree root intrusion |
$400 |
$3,500 |
FAQ
How often should you inspect your sewer lines with a camera?
You should inspect your sewer lines once a year. If you notice slow drains or bad smells, check sooner. Regular checks help you find problems early.
Can you use a sewer camera if you have no plumbing experience?
Yes, you can use a sewer camera as a beginner. Follow the instructions in the manual. Wear safety gear and move the camera slowly for best results.
What should you do if the camera gets stuck in the pipe?
Stop pushing the camera. Gently pull it back. If it does not move, do not force it. You may need to call a plumber for help.
Are sewer camera inspections safe for all types of pipes?
Most sewer cameras work with PVC, cast iron, and clay pipes. Always check your camera’s manual. Avoid using the camera in damaged or collapsed pipes.


No comments


0 comments