
How to Find Your Sewer Cleanout Before a Camera Inspection
 Michael Carter
0 comments
Michael Carter
0 comments
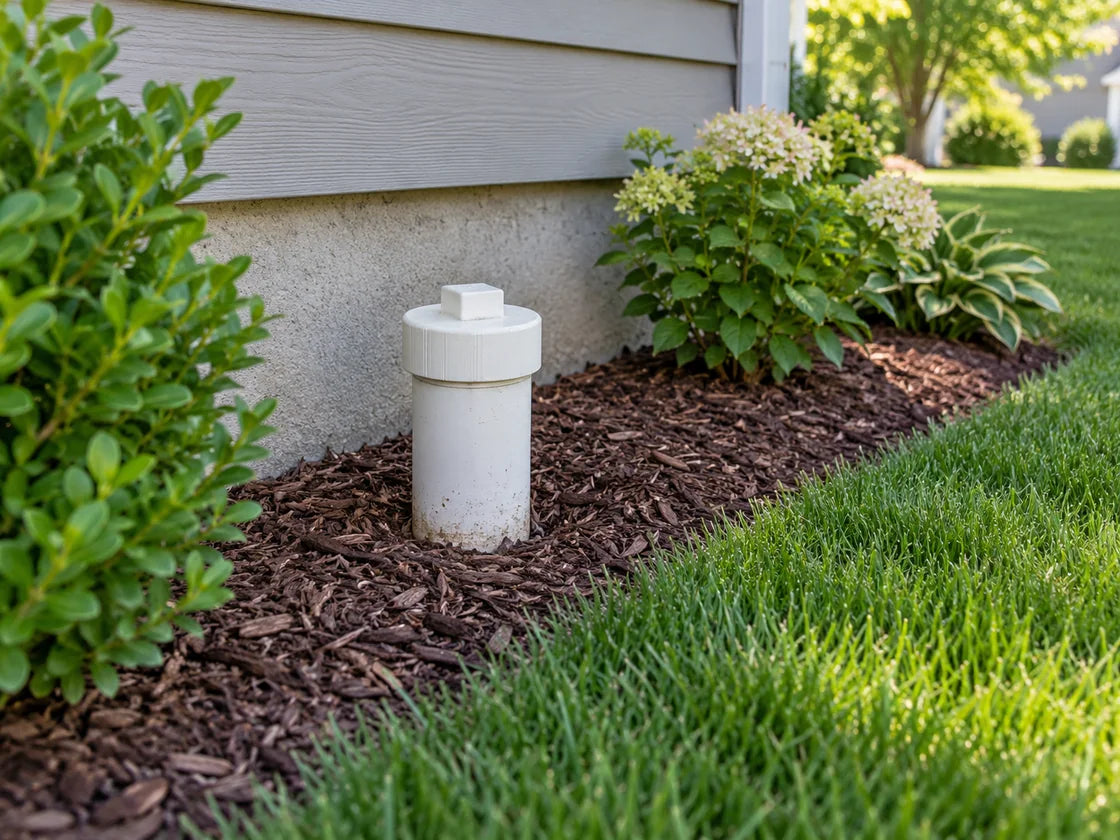
To find your sewer cleanout before a camera inspection, start with a visual search for a capped pipe and compare what you find with existing plumbing records. Look around accessible exterior walls and landscaped edges, then check accessible basement plumbing if your home has it. Photograph possible access points without opening them. If you cannot identify the right connection, ask the inspection provider to confirm access before the appointment.
Finding an entry point is a preparation task, not a diagnosis. This guide helps you organize that search, communicate uncertainty, and arrive at an inspection with a clear access plan. It does not authorize digging, cap removal, or entry into unsafe spaces.
↑ Back to topWhat is a sewer cleanout?
A sewer cleanout is a capped access pipe connected to a property's sanitary drainage system. The City of Minneapolis describes it as access to the sanitary sewer lateral for cleaning. That access may also be useful to an inspection professional, who must confirm whether it serves the intended line. See the city's sewer cleanout explanation.
Keep three questions separate: Have I found a possible cleanout? Does it connect to the line I want inspected? Can the professional use it safely? A photograph may help answer the first question; it does not settle all three.
For your appointment notes, use “possible cleanout” until the provider confirms it. That wording prevents a guess from becoming an assumption in the work order. It also gives the provider a chance to ask for a wider photograph or arrange an initial assessment.
↑ Back to topRecognize clues without opening anything
Look for a closed access fitting, not a particular color alone. Mansfield, Texas, explains that cleanout caps vary in size, color, and material; its examples include locations in flowerbeds, yards, and around paved areas. Its guidance describes exterior PVC cleanouts near homes, but those local examples are not a nationwide installation rule. Review the city's cleanout photographs and descriptions.
Make a simple photo set: one close view of the closed cap, one wider view showing the wall or pathway, and one view showing the approach to the area. Include any visible writing without scraping, dismantling, or lifting an unfamiliar cover. A location description such as “beside the side gate, facing the driveway” is more useful than “somewhere outside.”
Do not use resemblance as proof. If you are unsure whether a cover belongs to plumbing or another service, leave it alone and label the photograph as unidentified. Likewise, do not assume two nearby caps provide interchangeable access. Ask the technician to identify the relevant connection.
↑ Back to topA practical visual-search checklist
Use this suggested sequence to keep your search organized. Limit it to places you can reach and observe safely; finding every pipe on the property is not the objective.
- Gather existing information. Pull together previous inspection reports, plumbing invoices, purchase documents, and photographs. Look for an access-point description or a sketch. Treat old notes as clues to verify, especially if the property has changed.
- Walk accessible exterior edges. Observe the wall, nearby planting borders, and visible capped fittings. Do not shift heavy planters, dismantle decks, or enter a neighbor's property to extend the search.
- Check accessible indoor plumbing areas. Minneapolis identifies basements and front yards as possible locations in its local guidance. If you have an accessible basement, photograph visible candidates without disturbing plumbing. Do not extrapolate local code details to your home.
- Record candidates separately. Label photos A, B, and C and add their locations. A short list of uncertain candidates is more helpful than presenting one unverified choice as the main sewer access.
- Send the information before the visit. Ask which candidate, if any, appears appropriate and whether on-site confirmation is needed. Let the provider decide what additional access work belongs in the appointment.
Set a stopping point before you start. For example, decide to complete a visual walk and review your records, then contact the provider if the answer is still unclear. Repeating the same search with more force or more tools is not a better identification method.
↑ Back to topUse records to ask better questions
Ask the previous owner, property manager, or plumber whether they have a photograph of the access point used during earlier work. If a report says only “exterior cleanout,” ask whether its original author can clarify the location. Keep the report date alongside the information.
You can also ask your local building or sewer department whether relevant property records are available. Do not assume a department has a complete private plumbing layout or that a drawing proves the current installation. The useful outcome is a lead for the professional to verify.
Consider this hypothetical example: an old invoice mentions an access point near a garage, but your photographs show only an unfamiliar cover beside a newer patio. Send both pieces of information. Do not remove the cover to make the property fit the invoice, and do not call the cleanout missing solely because the old description is unclear.
Keep your questions specific: “Does this photograph show the access you need?” and “If it does not, should I book a location assessment first?” These questions make the next step concrete without asking the homeowner to make a plumbing determination.
↑ Back to topIf you cannot find the cleanout
Stop the visual search and request help. Minneapolis notes that an unlocated cleanout may be absent or concealed and recommends contacting a plumber. Not finding it yourself does not establish which situation applies.
Tell the provider exactly what remains unknown: the location, the identity of a visible fitting, or whether the fitting is usable. Avoid booking on the assumption that “there must be an entrance somewhere.” Ask how the provider handles uncertain access and whether the initial visit can be limited to assessment.
If someone proposes excavation, make utility coordination part of that separate plan. The Common Ground Alliance says to contact 811 before digging, wait the required response period, and confirm responses before work starts. This guide's visual search is not permission to probe soil or dig for a buried cleanout.
Finding an access point and tracing an underground route are different questions. For the latter, read Powerwill's underground pipe locator guide. Share the actual locating requirement with a professional instead of assuming a visible cap establishes the buried route.
↑ Back to topPrepare for the inspection appointment
Send a short access note with your booking. The following is a suggested template, not a technical assessment:
Appointment note: “I want the residential sewer line inspected. Photos A and B show possible access points; neither has been opened. The side gate is available by arrangement. Please confirm whether you can assess access on arrival and explain any separate work before proceeding.”
Add the reason for the inspection in your own words. “Preparing for a home purchase” or “requesting documentation after previous work” is enough to start the conversation. If there are current symptoms, describe what you observed and when, without assigning a hidden cause.
- Confirm who can authorize access and who will be present.
- Agree on a clear route to the candidate location and arrange pets or stored belongings accordingly.
- Ask whether the quoted service includes access assessment, video delivery, and a written report.
- Ask what happens if the proposed entry point cannot be used.
- Request a separate explanation before additional plumbing or access work.
InterNACHI's sewer scope standards exclude several activities from required inspection work, including moving obstructions and pulling toilets. Discuss the provider's own scope before the appointment. Do not remove a toilet, climb a roof, or force a cap to prepare for an ordinary visual search.
↑ Back to topWhat a confirmed cleanout does not prove
A confirmed entrance is the beginning of the inspection plan. It is not a statement that the entire line was inspected or that no repairs are needed. Ask the report to identify the inspected portion and any uninspected areas; InterNACHI's standards call for documenting those limitations.
Keep inspection and clearing separate. RIDGID's SeeSnake camera guidance warns against using a camera to clear obstructions and notes that obstructions can prevent retrieval. A camera documents visible conditions; it does not repair the pipe or replace professional judgment.
For a one-property decision, consider hiring an inspection provider who can explain the findings. Repeat-use professionals can review equipment after defining the access and reporting requirements. Powerwill's sewer camera inspection guide provides related workflow context; use your actual equipment instructions and the professional's assessment for the job.
↑ Back to topFive key takeaways
- Start with a visual search and existing records.
- Photograph possible access points and preserve uncertainty.
- Ask a professional to confirm the appropriate entry point.
- Stop before digging, dismantling, or forcing access.
- Agree on inspection scope and reporting before the appointment.
Frequently asked questions
Where should I look first?
Start with records and a safe walk around accessible exterior areas. Check an accessible basement if you have one. Use local examples as clues, then have the provider confirm what you found.
Should I open the cap to confirm it?
No opening is needed for the visual preparation described here. Send photographs of the closed fitting and let the provider assess identification, condition, and appropriate access.
Does a missing visible cleanout mean I need a new one?
That conclusion requires an assessment. Ask a plumber to determine whether an existing access point is concealed or whether other work is needed before authorizing installation.
Can I book an inspection before I locate it?
Contact the provider and disclose the uncertainty when booking. Ask whether access assessment is included and how the appointment will proceed if a suitable entrance is not available.
What should I save after the visit?
Keep the confirmed access photograph, location notes, inspection report, and recording together. Ask the provider to explain any limitations so the next visit starts with documented information.
Your next step
Create the photo set, gather existing records, and send the access note. Powerwill's Inspect Before Repair approach starts with a clear question and documented observations. Confirm the entrance, agree on the inspection scope, and use the findings to discuss the next decision.
↑ Back to top
Comments
No comments