
7 Yard Drainage Problems Heavy Rain Can Reveal
 Michael Carter
0 comments
Michael Carter
0 comments
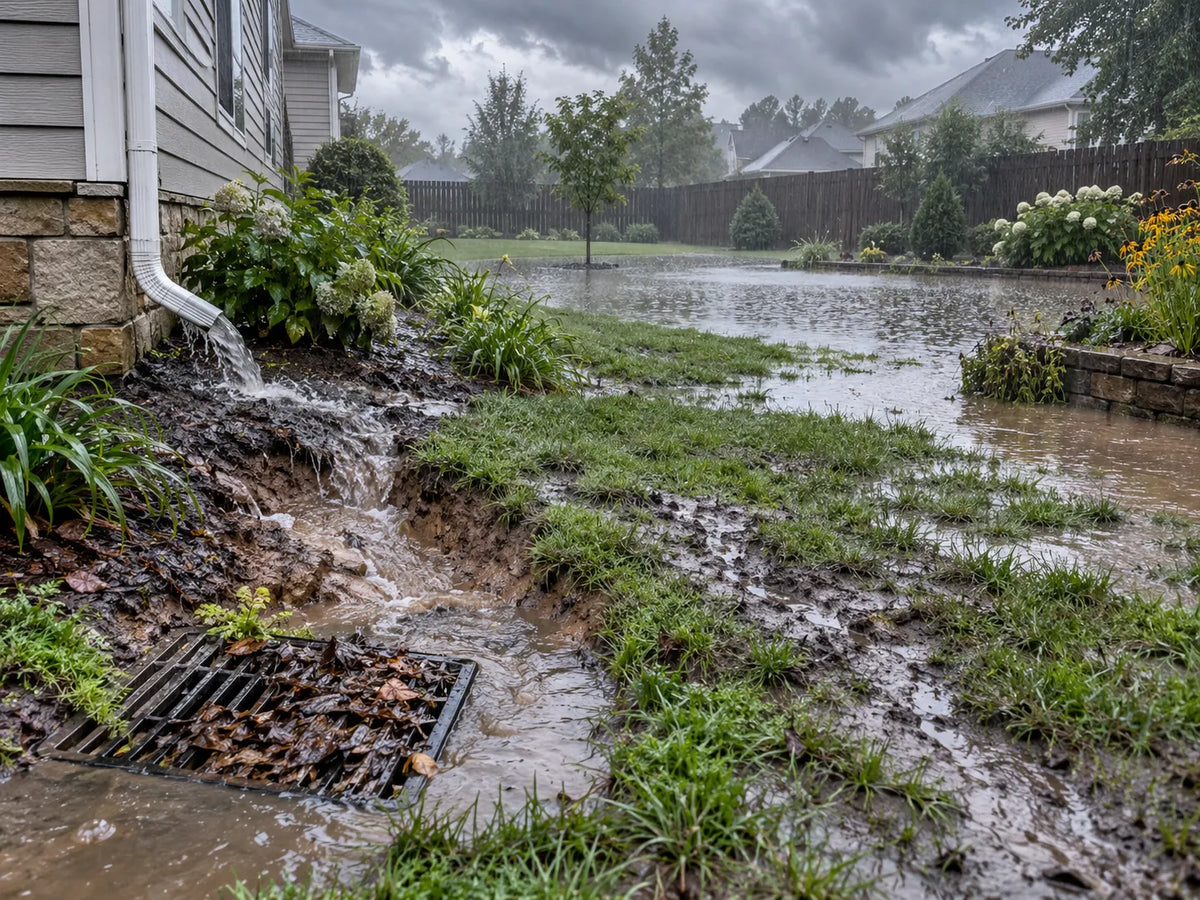
Yard drainage problems that heavy rain can reveal include recurring low-spot puddles, compacted lawn areas, concentrated downspout runoff, water beside the foundation, covered drain grates, a buried drain that appears to back up, and erosion along a runoff route. These are clues to investigate, not proof of a broken pipe. Start by recording where water appears and where it is supposed to go. A pipe camera can help inspect an accessible private drain, but it cannot diagnose every landscape problem, clear a blockage, or replace professional repair.
September is a useful reminder to review your property's drainage. The National Hurricane Center identifies September 10 as the Atlantic season's climatological peak, with most activity between mid-August and mid-October. That is a seasonal pattern, not a forecast for your home. Use local weather alerts to decide when outdoor work is appropriate.
Keep observations on your own residential property. The National Weather Service advises staying out of floodwater and obeying evacuation instructions. Record what you can from a safe indoor location during dangerous weather, then leave hands-on inspection until conditions are safe. Do not open a public drain or enter a drainage structure.
1. A puddle returns to the same low spot
A recurring puddle tells you where water collects; it does not identify the cause on its own. The University of Maryland Extension explains that poor drainage can involve low ground, clay-rich soil, compaction, or restricted movement through the soil.
For your inspection notes, give the location a recognizable name, such as “the lawn between the shed and walkway.” Photograph the same view after separate rain events, and write down when each photo was taken. Include the edge of the puddle and nearby features so another person can understand its position. A close-up of water alone offers little context.
Ask what is still unknown: Does the area have an existing inlet? Where is its intended outlet? Was this spot designed to collect runoff? Avoid labeling the problem “collapsed pipe” unless an inspection supports that conclusion. A useful contractor question is, “Can you assess the surface elevations and soil drainage before recommending a buried system?”
↑ Back to top2. A traveled strip of lawn stays soggy
A wet strip along a frequently used route deserves a soil and traffic review as well as a drainage review. Maryland Extension's lawn guidance explains that foot and vehicle traffic compact soil, reducing the pore space that helps water drain. Wet soil is particularly vulnerable to compaction.
For example, mark a repeated mower route or the path from the back door to the gate on your sketch. Note whether the wet area follows that route or extends across the whole lawn. This is an observation exercise, not a soil test. Brown grass, mud, and a soft surface should be recorded separately instead of being bundled into a diagnosis.
Before booking a camera inspection, establish whether there is actually a pipe serving the area. A camera view inside a nearby pipe cannot establish the condition of all the surrounding soil. Share the traffic pattern with a landscape professional and ask whether soil assessment is the appropriate first step. Keep any proposed lawn treatment separate from a claim that the buried drainage has been repaired.
↑ Back to top3. Roof runoff concentrates beside a downspout
Check the roof-water route when the wettest patch begins at a downspout. The University of Minnesota Extension estimates that a one-inch rain deposits about 1,250 gallons on a 2,000-square-foot roof. It identifies gutter, downspout, and grading problems as important exterior moisture sources.
Once conditions are safe, photograph the downspout from ground level. Record whether it ends above ground or connects to a buried line. If you know the discharge point, add it to the sketch; if you do not, write “outlet unknown.” That is more useful than assuming every visible pipe connects to the same destination.
As an example, your note might say, “Water appeared around the rear downspout connection; the front downspout area looked dry.” Ask the contractor to confirm the route and assess the inlet, buried section, and outlet together. The comparison can guide a conversation, but it cannot prove where a restriction sits. Avoid choosing an excavation point from the surface wet spot alone.
↑ Back to top4. Water collects along the house or patio edge
Water near a building calls for a review of how the surrounding surfaces direct runoff. Minnesota Extension identifies ground that does not slope away from a foundation as one possible contributor to basement moisture. It also explains that indoor dampness can have other sources, including condensation.
Document the outside and inside observations separately. “Puddle beside the patio door” and “damp patch on the basement wall” are useful descriptions; “yard pipe caused basement flooding” is a conclusion that needs evidence. Include the time, location, and whether each observation repeats. Keep photos of previous events together so the reviewer can see what changed.
Ask for an assessment of the building edge, surface drainage route, and relevant drainage components. If the proposed repair is a new pipe, ask what evidence links that pipe to the observed water. Do not treat camera footage of one clear line as proof that grading or building moisture issues have been resolved. These questions help keep the work tied to the actual symptom.
↑ Back to top5. Leaves or mulch cover a yard-drain grate
A covered inlet is a visible maintenance issue worth documenting before looking underground. The drainage manufacturer NDS calls for removing debris from surface inlets and periodically cleaning catch-basin sumps as part of exterior drainage maintenance.
Take a ground-level photo that shows both the grate and the surrounding landscape. Record the visible material without guessing how far it extends: “leaves on grate” is more precise than “pipe packed with leaves.” Have maintenance performed through the appropriate safe access and according to the system's instructions. Keep the maintenance record with the original photo.
Then record whether the symptom returns during a later event that can be observed safely. Do not claim a complete repair just because the grate now looks clean. The inlet, basin, connecting pipe, and discharge point are separate parts of the route. If you need help identifying the visible structure, see our homeowner's guide to catch basins.
↑ Back to top6. An existing buried drain appears to back up
Repeated backup after visible inlet maintenance makes the rest of the drainage route worth investigating. NDS's exterior drainage guide notes that a pipeline may be clogged when the surface inlets and basin sumps are clear. “May” matters: the observation alone is not confirmation.
Ask an inspector what an internal camera view can establish for your particular line and access point. Request a recording that identifies the entry location, travel direction, observed features, and any section that could not be viewed. Keep “not inspected” distinct from “clear.” A report should explain its limits instead of implying that unseen pipe was checked.
The Powerwill PW9D1 product page lists a 9-inch IPS monitor and a self-leveling camera. Those are viewing features, not guarantees that a camera can negotiate every residential drain. Confirm the pipe route, access, bends, and equipment suitability before arranging an inspection. Use footage to inform the next decision; cleaning and repair remain separate work.
↑ Back to top7. Runoff leaves erosion tracks or displaced mulch
A visible runoff track is a reason to map the surface route as well as any buried infrastructure. The Maryland Department of Agriculture's erosion guidance emphasizes identifying where water travels as an initial step in addressing erosion.
Use wide photos to show the beginning, middle, and end of the visible track from safe positions. Record bare soil, displaced mulch, and deposits as separate observations. For example, “mulch collected against the walkway” describes evidence without claiming the walkway caused the entire problem. Mark any part of the route you cannot see as unknown.
Ask a landscape drainage professional to review the surface flow path and the intended destination of the water. If a buried drain is part of a proposed solution, request an explanation of how it fits that route. A camera inspection of an existing line can be one piece of the assessment; it cannot replace the broader site review.
↑ Back to topTurn the seven clues into a useful inspection brief
A short, organized record gives a contractor a clearer starting point than a guessed repair request. Use one page for the property sketch and a separate photo list. The following is a suggested documentation format, not a technical drainage test.
- Location: Name the wet area and the nearest permanent feature.
- Timing: Record when the rain and each observation occurred.
- Route: Mark known inlets, downspouts, and outlets, leaving uncertain connections blank.
- History: List prior maintenance and whether the same symptom returned.
- Question: State what you want the inspection to clarify before selecting a repair.
For a before-the-weather walk-through, use the Powerwill storm drain inspection checklist. Keep observations from different events dated, and ask for an explanation of any remaining uncertainty in the final report.
↑ Back to topKey Takeaways
- Record the location and timing of recurring puddles before choosing a repair.
- Consider soil, traffic, roof runoff, and surface routes alongside existing buried drains.
- Document visible inlet maintenance without treating a clean grate as proof of a complete repair.
- Request camera findings that clearly distinguish inspected sections from unseen sections.
- Keep dangerous-weather observations at a safe distance and arrange hands-on work only when conditions allow.
Frequently Asked Questions
Does standing water mean my yard drain is broken?
No. Poor soil drainage, low ground, surface flow, and drain maintenance can all be relevant. Record the symptom first and ask for an assessment that explains which cause the evidence supports.
Should I inspect during heavy rain?
Do not enter floodwater to investigate a drain. Follow National Weather Service guidance and local alerts, and postpone outdoor inspection when conditions are unsafe.
Can a Powerwill camera fix yard drainage problems?
No. A Powerwill pipe camera is an inspection tool. It does not clear a restriction, change the landscape grade, or replace professional repair.
Which Powerwill camera should I choose for a buried downspout line?
Start with the line's access and suitability requirements, then compare current equipment configurations. The PW9D1 viewing features described above do not establish compatibility with every pipe or bend; ask for a suitability review before purchase.
What should I send a drainage contractor?
Send a dated sketch, wide photos, known drain locations, and previous maintenance notes. State the unresolved question plainly, such as whether the problem involves surface flow or an existing buried route.
Inspect Before Repair
Use the seven observations to define what needs checking. Keep confirmed findings, possible causes, and unanswered questions separate so the next step follows the evidence.
If an accessible private pipe is part of that assessment, compare current Powerwill PW9D1 configurations and confirm suitability for your application. Pair any inspection footage with a repair professional's assessment when further work is needed.
↑ Back to topSources
- National Hurricane Center — Tropical Cyclone Climatology
- National Weather Service — During a Flood
- University of Maryland Extension — Common Soil Problems
- University of Maryland Extension — Lawn Problems Not Caused by Pests or Diseases
- University of Minnesota Extension — Moisture in Basements
- NDS — Principles of Exterior Drainage
- Maryland Department of Agriculture — Control Erosion
- Powerwill — PW9D1 Product Specifications
Comments
No comments